บทความนี้ตีพิมพ์ และ เผยแพร่เมื่อ 10 เมษายน 2024
GraphQL เป็นภาษาที่ใช้ในการ Query ข้อมูลจากฐานข้อมูล ซึ่งทำหน้าที่คล้ายกับ REST API แต่มีข้อดีคือสามารถกำหนดข้อมูลที่ต้องการใช้ ทำให้การเรียกใช้ข้อมูลไม่มีข้อมูลส่วนเกิน เหมือนกับการใช้ REST API และมี Endpoint เพียงที่เดียว สำหรับผู้อ่านที่สนใจความแตกต่างระหว่าง REST API กับ GraphQL ลองไม่ดูบทความดีๆ เพิ่มเติมได้ที่ https://www.borntodev.com/2020/07/23/graphql/ ในบทความนี้เราจะมาสร้างโปรเจกต์เล็กๆ ด้วย Node.js เพื่อลองดูสร้าง API ในการเรียกใช้ข้อมูล และการเพิ่มข้อมูลโดยใช้ GraphQL กันนะครับ
เริ่มสร้างโปรเจคกันเลย
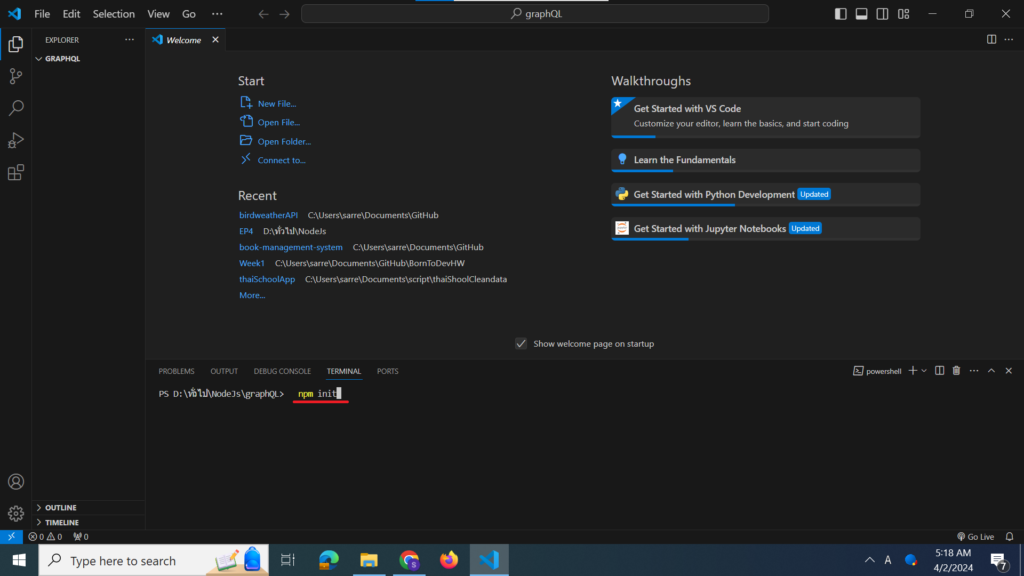
การสร้างโปรเจกต์ด้วย Node.js ในบทความนี้จะใช้ Visual Studio Code นะครับ สำหรับผู้ที่ยังไม่มี Visual Studio Code สามารถดาวน์โหลดได้ที่ https://code.visualstudio.com/ เมื่อเปิด Visual Studio Code แล้วให้ทำการสร้างโฟลเดอร์สำหรับเก็บโปรเจกต์ที่สร้าง จากนั้นพิมพ์คำสั่ง npm init ใน Terminal ดังรูป เพื่อเป็นการ Setup โปรเจกต์
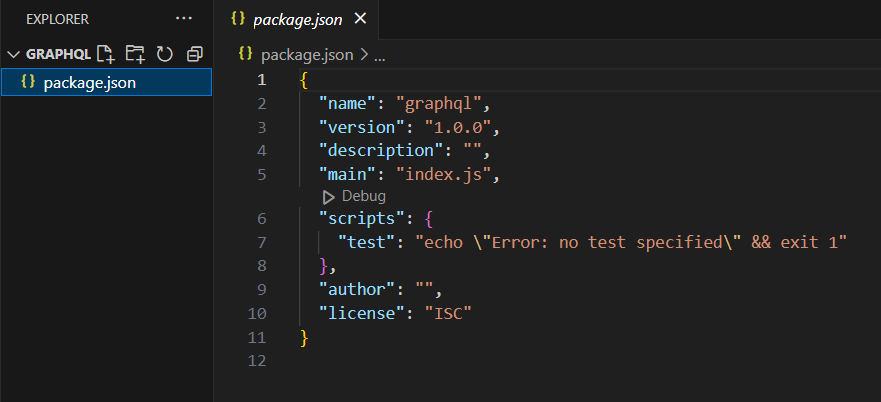
ซึ่งจะปรากฏไฟล์ package.json ขึ้น ดังรูป
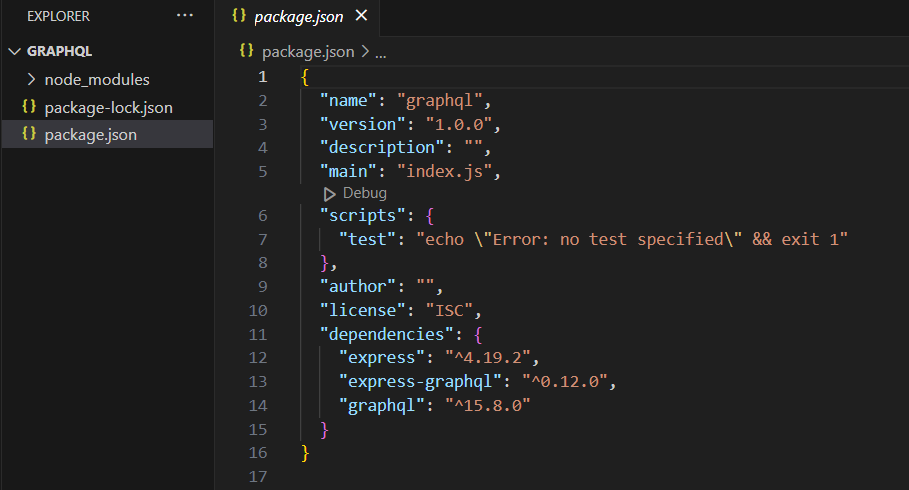
ลง Package ต่างๆ ที่ใช้ในโปรเจกต์ได้แก่ express express-graphql และ graphql โดยพิมพ์คำสั่ง npm i express express-graphql graphql ใน Terminal เมื่อติดตั้ง Package เสร็จจะปรากฎ Package ต่างๆ ที่ลงในไฟล์ package.json ดังรูป
สร้างไฟล์ใหม่ชื่อ index.js ในโฟลเดอร์โปรเจกต์ จากนั้นพิมพ์คำสั่ง
const express = require("express");
const app = express();
const port = 3000;

app.listen(port, () => {
  console.log("Listening on port %d", port);
});จากนั้นตรวจสอบว่า Server ของเราทำงานได้หรือไม่ โดยพิมพ์ node index.js ใน Terminal ซึ่งควรจะปรากฏข้อความ “Listening on port 3000” ดังรูป

การเตรียมข้อมูลทดสอบ
โปรเจกต์นี้จะใช้ข้อมูลทดสอบซึ่งประกอบด้วยข้อมูล ไอดี ชื่อ นามสกุล อีเมล และพาสเวิร์ด ของผู้ใช้งาน ซึ่งเก็บอยู่ในรูป Array ของ Object ดังรูป

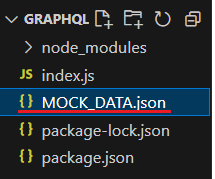
ข้อมูลทดสอบนี้สร้างจาก https://www.mockaroo.com/ โดยข้อมูลที่สร้างขึ้นจากเว็บไซต์สามารถกำหนดรูปแบบของไฟล์ได้ ซึ่งในงานนี้เราจะใช้ไฟล์ประเภท JSON เมื่อสร้างข้อมูลทดสอบจากเว็บไซต์แล้ว ให้นำไฟล์ที่ได้ไปไว้ในโปรเจกต์
จากนั้นเรียกใช้งานข้อมูลในไฟล์ index.js

ตอนนี้เราก็พร้อมที่จะสร้าง API สำหรับการเรียกใช้ข้อมูล และเพิ่มข้อมูลด้วย GraphQL แล้ว
การเรียกดูข้อมูล และการเพิ่มข้อมูลด้วย GraphQL
Schema
GraphQL ใช้ Schema ในการอธิบายลักษณะของข้อมูลในฐานข้อมูลที่สามารถใช้งานได้ ซึ่งจะระบุรูปแบบลำดับขั้น (Hierarcyh) ของ Type ที่ประกอบด้วย Fields โดย GraphQL ได้กำหนด Syntax ในการเขียน Schema ที่เรียกว่า Schema Definition Language (SDL) ซึ่งมีลักษณะดังนี้
type Users {
  id: int!
  firstName: string!
  lastName: string
  email: string!
  password: string!
}จากข้างต้นเป็นการสร้างตัวแปรประเภท Type ที่ชื่อว่า Users ซึ่งมี Fields ประกอบด้วย id ซึ่งเป็นตัวแปรประเภท int และ firstName lastName email password ซึ่งเป็นตัวแปรประเภท string นอกจากนี้จะสังเกตเห็นว่าด้านหลังประเภทของตัวแปร บางตัวแปรจะมีเครื่องหมาย ! อยู่ ซึ่งเป็นการระบุว่าในการสร้าง Users จำเป็นต้องใส่ค่าตัวแปรที่มีเครื่องหมาย ! อยู่
ตัวแปรประเภท Type ยังใช้ในการกำหนดการ Queries และ Mutation อีกด้วย โดย Queries คือการเรียกดูข้อมูลจากฐานข้อมูล Mutations คือการเปลี่ยนแปลงข้อมูลในฐานข้อมูลเช่น สร้าง แก้ไข และลบ ข้อมูล
เริ่มเขียน API กันเลย
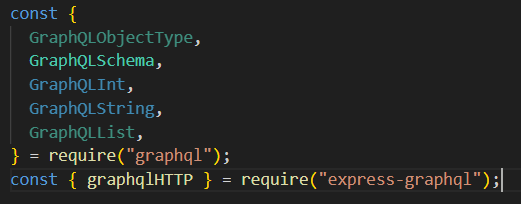
ก่อนอื่นกลับไปที่ index.js ไฟล์ จากนั้นเรียกใช้ Package ต่างๆ ในการสร้าง GraphQL ดังรูป
สำหรับการสร้าง API เพื่อใช้ GraphQL ในการเรียนดูข้อมูล และการเพิ่มข้อมูลโดยใช้ Package “express-graphql” จะมีลักษณะการเขียนดังรูป
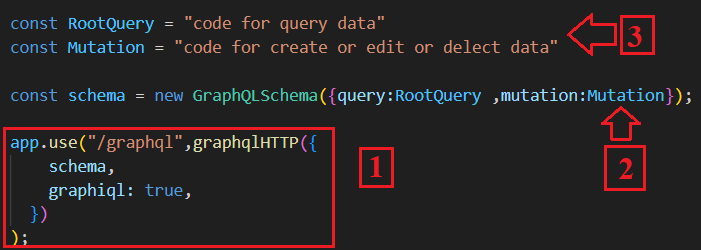
เพื่อให้เห็นภาพรวมและเข้าใจได้ง่าย ขออธิบาย Code จากด้านล่างไปสู่ด้านบน โดย
ส่วนที่ 1 เป็นการสร้าง Endpoint ซึ่งจะมีแค่ที่เดียว ในบทความนี้ใช้ graphqlHTTP ที่เป็นฟังก์ชันใน Package “express-graphql”
ส่วนที่ 2 คือการสร้างตัวแปร Schema ซึ่งประกอบด้วย Query และ Mutation
ส่วนที่ 3 ตัวแปร RootQuery และ Mutation จะเป็นส่วนตัวแปรที่เก็บตัวแปรประเภท Type ของ Query และ Mutation ตามลำดับ ซึ่งจะแสดงตัวอย่างการวิธีการเขียนต่อไป
การเขียนตัวแปรประเภท Type ที่ชื่อว่า Users โดยใช้ GraphQLObjectType จะมีลักษณะแตกต่างจากที่แสดงไปแล้วก่อนหน้าเล็กน้อย โดยสามารถเขียนได้ ดังรูป
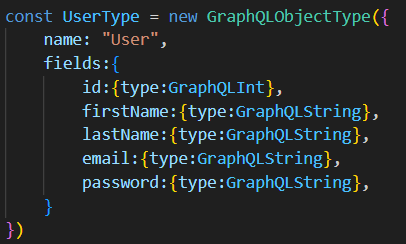
โดย name เป็นชื่อไว้ใช้อ้างอิงซึ่งสามารถตั้งได้ตามอิสระ
Fields เป็นส่วนที่กำหนดว่าตัวแปร UserType จะมี Fields ชื่ออะไรและเป็นตัวแปรประเภทใด เช่น มี Fields ชื่อ id ที่เป็นตัวแปรประเภท GraphQLInt
การเขียน Query มีลักษณะคล้ายกับ User ดังรูป
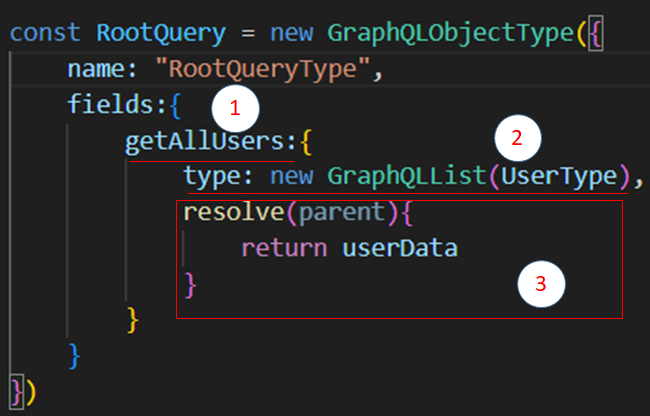
โดยภายใน Fields ของ Query
ส่วนที่ 1 จะกำหนดคำสั่งที่ใช้ในการ Query
ส่วนที่ 2 กำหนดประเภทของตัวแปรที่จะส่งกลับไปให้ผู้ใช้งาน
ส่วนที่ 3 จะเป็นส่วนที่จัดการข้อมูลก่อนส่งข้อมูลกลับไปให้ผู้ใช้งาน
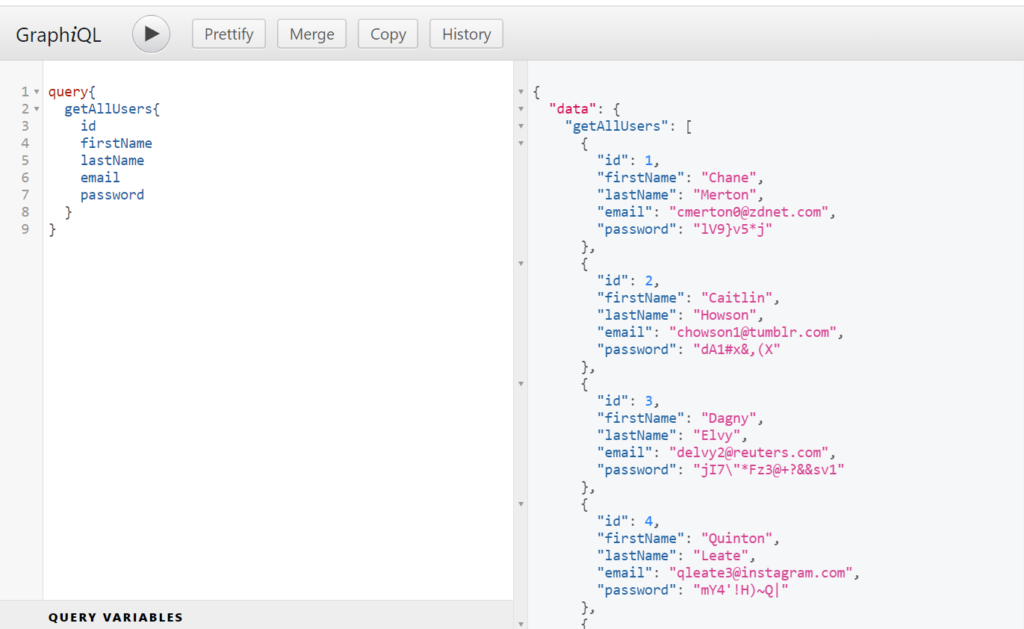
ตัวอย่างการใช้ Query “getAllUsers” ในการเรียกดูข้อมูลผู้ใช้งานทั้งหมด
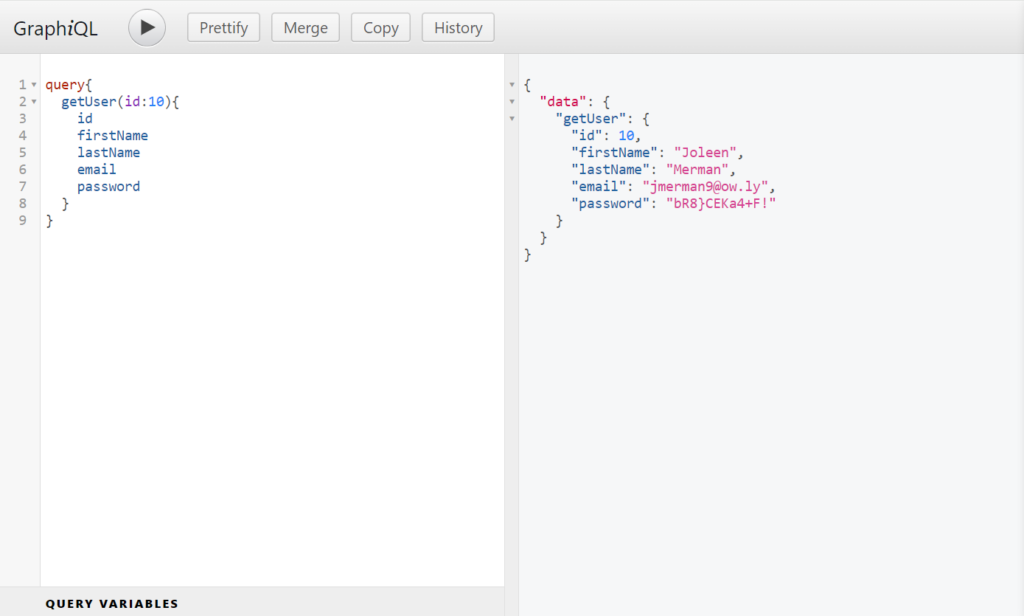
ตัวอย่างข้างต้นเป็นการเขียน Query เพื่อเรียกดูข้อมูลทั้งหมดของ User หากต้องการเพิ่มคำสั่งที่ใช้ในการ Query เช่น การเรียกดูข้อมูลของ User โดยระบุ id ของ User ก็สามารถทำได้ดังรูป
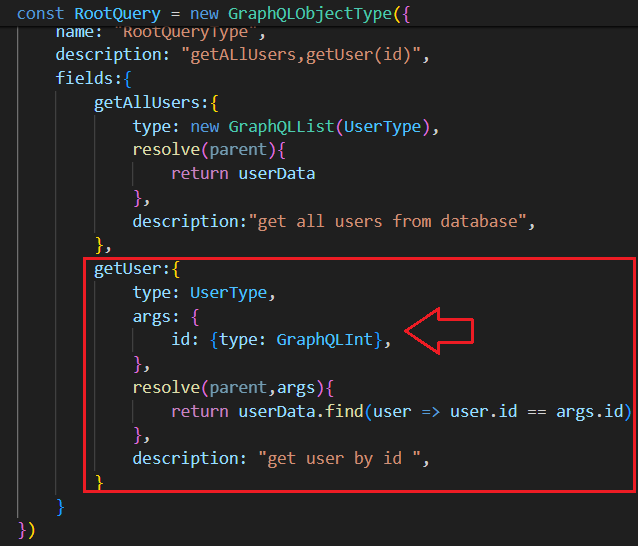
args เป็นตัวแปรที่ระบุประเภทของข้อมูลที่ผู้ใช้งานต้องใช้ในการ Query และเป็นตัวแปรที่เก็บข้อมูลนั้นไว้สำหรับนำไปใช้ในการจัดการข้อมูล
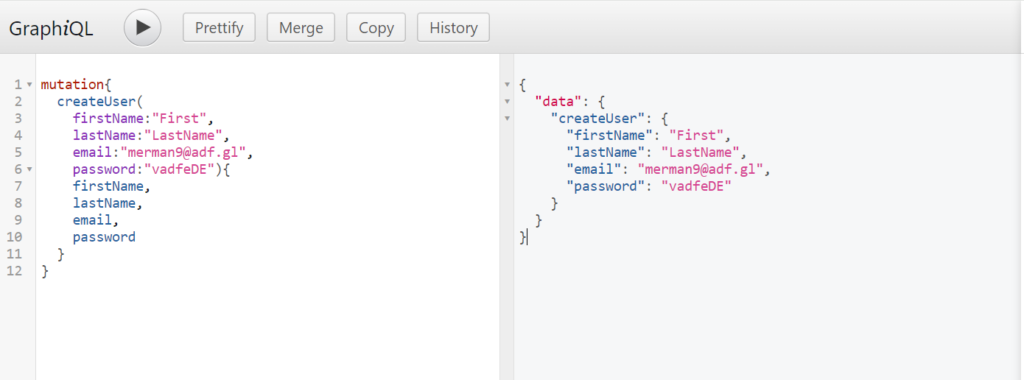
ตัวอย่างการเขียน Mutation เพื่อเพิ่มข้อมูล User เป็นดังรูป
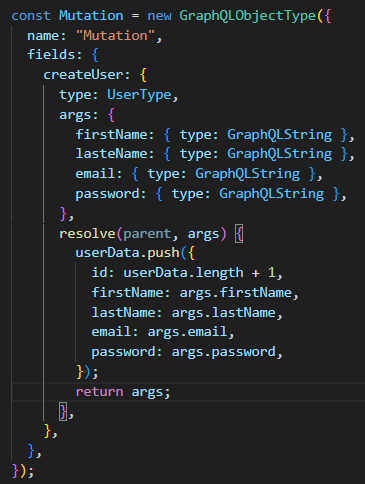
การเพิ่มข้อมูล User จะรับข้อมูลเพียง firstName lastName email และ password เท่านั้น ส่วน id จะมีค่าเพิ่มขึ้นเองโดยอัตโนมัติ
โค้ดที่ใช้ในบทความนี้สามารถ copy ได้จากด้านล่างนี้
const express = require("express");
const app = express();
const port = 3000;
const userData = require("./MOCK_DATA.json");
const graphql = require("graphql");
const {
  GraphQLObjectType,
  GraphQLSchema,
  GraphQLInt,
  GraphQLString,
  GraphQLList,
} = require("graphql");
const { graphqlHTTP } = require("express-graphql");

const UserType = new GraphQLObjectType({
  name: "User",
  fields: {
    id: { type: GraphQLInt },
    firstName: { type: GraphQLString },
    lastName: { type: GraphQLString },
    email: { type: GraphQLString },
    password: { type: GraphQLString },
  },
});

const RootQuery = new GraphQLObjectType({
  name: "RootQueryType",
  description: "getALlUsers,getUser(id)",
  fields: {
    getAllUsers: {
      type: new GraphQLList(UserType),
      resolve(parent) {
        return userData;
      },
      description: "get all users from database",
    },
    getUser: {
      type: UserType,
      args: {
        id: { type: GraphQLInt },
      },
      resolve(parent, args) {
        return userData.find((user) => user.id == args.id);
      },
      description: "get user by id ",
    },
  },
});

const Mutation = new GraphQLObjectType({
  name: "Mutation",
  fields: {
    createUser: {
      type: UserType,
      args: {
        firstName: { type: GraphQLString },
        lasteName: { type: GraphQLString },
        email: { type: GraphQLString },
        password: { type: GraphQLString },
      },
      resolve(parent, args) {
        userData.push({
          id: userData.length + 1,
          firstName: args.firstName,
          lastName: args.lastName,
          email: args.email,
          password: args.password,
        });
        return args;
      },
    },
  },
});

const schema = new GraphQLSchema({ query: RootQuery, mutation: Mutation });

app.use(
  "/graphql",
  graphqlHTTP({
    schema,
    graphiql: true,
  })
);
app.listen(port, () => {
  console.log("Listening on port %d", port);
});
สรุป
การสร้าง API ในการเรียกใช้ข้อมูล และการเพิ่มข้อมูลโดยใช้ GraphQL สามารถทำได้โดยใช้ Query และ Mutation ซึ่งเป็นตัวแปรประเภท Type ซึ่งง่ายต่อการทำความเข้าใจ GraphQL เป็นทางเลือกหนึ่งในการสร้าง API ที่มีประสิทธิภาพ ซึ่งในอนาคตน่าจะถูกนำไปใช้งานอย่างแพร่หลายมากขึ้น ดังนั้นเราก็ควรที่จะศึกษาทำความเข้าใจ GraphQL ไว้บ้าง ก็น่าจะเป็นประโยชน์ต่อโปรเจคของเราในอนาคต
ข้อมูลอ้างอิง
https://www.brontodev.com2020/07/23/graphql/
https://dev.to/leonardomso/a-beginners-guide-to-graphql-3kjj
https://www.apollographql.com/docs/apollo-server/schema/schema/