สารจากผู้เขียน
มาต่อจากครั้งที่แล้วที่เราได้สอนสร้าง AppBar กันไป…สำหรับวันนี้หลายคนเรียกร้องกันมาเยอะเลยว่าอยากทำหน้าที่เราสามารถบันทึกสิ่งที่จะทำได้เหมือน TodoList ดังนั้นในวันนี้ผมจะมาสอนวิธีสร้างหน้า Add Task กัน !

มาต่อจากครั้งที่แล้วที่เราได้สอนสร้าง AppBar กันไป…สำหรับวันนี้หลายคนเรียกร้องกันมาเยอะเลยว่าอยากทำหน้าที่เราสามารถบันทึกสิ่งที่จะทำได้เหมือน TodoList ดังนั้นในวันนี้ผมจะมาสอนวิธีสร้างหน้า Add Task กัน !
 เขียนโดย
Chairawit Iamkhajornchai
Internship @ borntoDev
บทความนี้ตีพิมพ์ และ เผยแพร่เมื่อ 20 กรกฎาคม 2566
โดยที่ผู้ใช้สามารถทำการ Add, Delete, Edit ข้อความรวมไปถึง Check ว่าข้อความไหนทำเสร็จไปแล้วได้เลย
ซึ่งจะต่อยอดจากโค้ดเก่าจากรอบที่แล้ว จะเป็นยังไงก็ไปดูพร้อม ๆ กันเลยดีกว่า ลุยกัน 🔥
import React, { useState } from 'react';
import { View, Text, StyleSheet, TouchableOpacity, TextInput, FlatList } from 'react-native';
เริ่มจาก Import สิ่งที่เราจะต้องใช้กันนะครับ โดยรอบนี้จะมี TextInput กับ FlatList เพิ่มเข้ามา
const Task = () => {
  const [tasks, setTasks] = useState([]);
  const [task, setTask] = useState('');
  const [editingIndex, setEditingIndex] = useState(null);
  const [editedTask, setEditedTask] = useState('');

  const handleAddTask = () => {
    if (task.trim().length > 0) {
      setTasks([...tasks, { text: task, done: false }]);
      setTask('');
    }
  };

  const handleDeleteTask = (index) => {
    const updatedTasks = [...tasks];
    updatedTasks.splice(index, 1);
    setTasks(updatedTasks);
  };

  const handleEditTask = (index) => {
    setEditingIndex(index);
    setEditedTask(tasks[index].text);
  };

  const handleSaveEdit = () => {
    if (editedTask.trim().length > 0) {
      const updatedTasks = [...tasks];
      updatedTasks[editingIndex].text = editedTask;
      setTasks(updatedTasks);
      setEditingIndex(null);
      setEditedTask('');
    }
  };
ประกาศสร้างตัวแปร Task โดยภายใน Task จะมี ตัวแปรย่อยอีก 4 ตัวได้แก่ tasks , task, editIndex, editedTask
ประกาศสร้าง handleAddTask สำหรับไว้เพิ่ม Task ต่าง ๆ ที่จะทำ
ประกาศสร้าง handleDeleteTask สำหรับไว้ลบ Task
ประกาศสร้าง handleEditTask สำหรับแก้ไข Task ต่าง ๆ ที่แสดง
และทำการสร้าง handleSaveEdit สำหรับบันทึก Task ที่แก้ไขแล้ว
return (
    <View style={styles.container}>
      <Text style={styles.title}>Task List</Text>

      <FlatList
        data={tasks}
        renderItem={({ item, index }) => (
          <View style={styles.taskItem}>
            <TouchableOpacity
              style={[styles.toggleButton, item.done && styles.toggleButtonDone]}
              onPress={() => {
                const updatedTasks = [...tasks];
                 updatedTasks[index].done = !updatedTasks[index].done;
                 setTasks(updatedTasks);
              }}
            />
            {editingIndex === index ? (
              <TextInput
                style={styles.editInput}
                value={editedTask}
                onChangeText={(text) => setEditedTask(text)}
              />
            ) : (
              <View style={styles.taskTextContainer}>
                <Text style={[styles.taskText, item.done && styles.taskDone]}>{item.text}</Text>
              </View>
            )}
เริ่มจากการที่เราจะแสดงหน้าขึ้นมาในรูปแบบ FlatList โดยเราจะตั้งชื่อ Title ว่า Task List นะครับ
และตามด้วยการทำตัวเช็ค Edit ว่าถูกแก้ไขแล้วหรือยัง ถ้าแก้แล้วให้กดยืนยันเพื่อแสดงข้อมูลที่เปลี่ยนไปและมีการจัดทำตัวติ๊กเช็คว่า Task เสร็จหรือยังด้วย
<TouchableOpacity onPress={() => handleDeleteTask(index)}>
              <Text style={styles.deleteButton}>Delete</Text>
            </TouchableOpacity>
            {editingIndex === index ? (
              <TouchableOpacity onPress={handleSaveEdit} style={styles.editButton}>
                <Text style={styles.editButtonText}>Save</Text>
              </TouchableOpacity>
            ) : (
              <TouchableOpacity onPress={() => handleEditTask(index)} style={styles.editButton}>
                <Text style={styles.editButtonText}>Edit</Text>
              </TouchableOpacity>
            )}
          </View>
       )}
       keyExtractor={(item, index) => index.toString()}
     />

     <View style={styles.inputContainer}>
       <TextInput
         style={styles.input}
         placeholder="Add a new task"
         value={task}
         onChangeText={(text) => setTask(text)}
       />
       <TouchableOpacity onPress={editingIndex !== null ? handleSaveEdit : handleAddTask} style={styles.addButton}>
         <Text style={styles.addButtonText}>{editingIndex !== null ? 'Save' : 'Add'}</Text>
       </TouchableOpacity>
     </View>
   </View>
 );
};
ส่วนต่อมาจะทำการเช็คว่าเมื่อมีการลบ Task ไปจะอัปเดตให้ Task นั้นหายไปเมื่อทำการกดปุ่ม Delete
การแสดงปุ่มเมื่อกด Add ไปจะทำการเรียกใช้ฟังก์ชันในการทำงานแสดง Task ที่สร้างมาและสามารถ Edit ได้
เมื่อจบส่วนนี้ก็จะไปทำส่วน Styles ต่อโดยในส่วนนี้ก็แล้วแต่สะดวกเลยว่าใครจะตกแต่งกันยังไง เสร็จแล้วโค้ดทั้งหมดก็จะได้ประมาณนี้นะ
import React, { useState } from 'react';
import { View, Text, StyleSheet, TouchableOpacity, TextInput, FlatList } from 'react-native';

const Task = () => {
  const [tasks, setTasks] = useState([]);
  const [task, setTask] = useState('');
  const [editingIndex, setEditingIndex] = useState(null);
  const [editedTask, setEditedTask] = useState('');

  const handleAddTask = () => {
    if (task.trim().length > 0) {
      setTasks([...tasks, { text: task, done: false }]);
      setTask('');
    }
  };

  const handleDeleteTask = (index) => {
    const updatedTasks = [...tasks];
    updatedTasks.splice(index, 1);
    setTasks(updatedTasks);
  };

  const handleEditTask = (index) => {
    setEditingIndex(index);
    setEditedTask(tasks[index].text);
  };

  const handleSaveEdit = () => {
    if (editedTask.trim().length > 0) {
      const updatedTasks = [...tasks];
      updatedTasks[editingIndex].text = editedTask;
      setTasks(updatedTasks);
      setEditingIndex(null);
      setEditedTask('');
    }
  };

  return (
    <View style={styles.container}>
      <Text style={styles.title}>Task List</Text>

      <FlatList
        data={tasks}
        renderItem={({ item, index }) => (
          <View style={styles.taskItem}>
            <TouchableOpacity
              style={[styles.toggleButton, item.done && styles.toggleButtonDone]}
              onPress={() => {
                const updatedTasks = [...tasks];
                updatedTasks[index].done = !updatedTasks[index].done;
                setTasks(updatedTasks);
              }}
            />
            {editingIndex === index ? (
              <TextInput
                style={styles.editInput}
                value={editedTask}
                onChangeText={(text) => setEditedTask(text)}
              />
            ) : (
              <View style={styles.taskTextContainer}>
                <Text style={[styles.taskText, item.done && styles.taskDone]}>{item.text}</Text>
              </View>
            )}
            <TouchableOpacity onPress={() => handleDeleteTask(index)}>
              <Text style={styles.deleteButton}>Delete</Text>
            </TouchableOpacity>
            {editingIndex === index ? (
              <TouchableOpacity onPress={handleSaveEdit} style={styles.editButton}>
                <Text style={styles.editButtonText}>Save</Text>
              </TouchableOpacity>
            ) : (
              <TouchableOpacity onPress={() => handleEditTask(index)} style={styles.editButton}>
                <Text style={styles.editButtonText}>Edit</Text>
              </TouchableOpacity>
            )}
          </View>
        )}
        keyExtractor={(item, index) => index.toString()}
      />

      <View style={styles.inputContainer}>
        <TextInput
          style={styles.input}
          placeholder="Add a new task"
          value={task}
          onChangeText={(text) => setTask(text)}
         />
         <TouchableOpacity onPress={editingIndex !== null ? handleSaveEdit : handleAddTask} style={styles.addButton}>
           <Text style={styles.addButtonText}>{editingIndex !== null ? 'Save' : 'Add'}</Text>
         </TouchableOpacity>
       </View>
     </View>
   );
};

const styles = StyleSheet.create({
  container: {
    flex: 1,
    padding: 16,
    backgroundColor: '#fff',
  },
  title: {
    fontSize: 24,
    fontWeight: 'bold',
    marginBottom: 16,
  },
  taskItem: {
    flexDirection: 'row',
    alignItems: 'center',
    marginBottom: 8,
  },
  toggleButton: {
    width: 20,
    height: 20,
    borderWidth: 1,
    borderColor: '#000',
    marginRight: 8,
  },
  toggleButtonDone: {
    backgroundColor: 'green',
  },
  taskTextContainer: {
    flex: 1,
  },
  taskText: {
    fontSize: 16,
    flex: 1,
  },
  taskDone: {
    textDecorationLine: 'line-through',
    color: 'gray',
  },
  deleteButton: {
    color: 'red',
    marginLeft: 16,
  },
  editInput: {
    flex: 1,
    borderWidth: 1,
    borderColor: '#ccc',
    padding: 8,
    marginRight: 8,
  },
  inputContainer: {
    flexDirection: 'row',
    alignItems: 'center',
    marginTop: 16,
  },
  input: {
    flex: 1,
    borderWidth: 1,
    borderColor: '#ccc',
    padding: 8,
    marginRight: 8,
    fontSize: 18, // Increase the font size for the text input
  },
  addButton: {
    backgroundColor: 'green',
    padding: 8,
    borderRadius: 4,
  },
  addButtonText: {
    color: 'white',
    fontWeight: 'bold',
  },
  editButton: {
    backgroundColor: 'blue',
    padding: 8,
    borderRadius: 4,
    marginLeft: 8,
  },
  editButtonText: {
    color: 'white',
    fontWeight: 'bold',
  },
});

export default Task;
แนะนำ⭐ ให้ลงมือเขียนด้วยตัวเองดูก่อนนะครับไม่แนะนำให้ใช้ `**ctrl+ c → ctrl + v**` น้าาด้วยความหวังดี 😂
เมื่อถึงขั้นนี้ก็ใกล้จะเสร็จแล้วลำดับต่อไปให้เพื่อน ๆ
ไปที่ `App.js` ของตัวเองแล้ว `Import Task` มาใช้กัน
import Task from 'พิกัดที่เก็บไฟล์ Task.js';เสร็จแล้วก็เรียกใช้ Component Task ที่เราสร้างมาได้เลยตามปกติแล้วลอง Run ทดสอบดูก็จะได้หน้าตาแบบนี้เลย

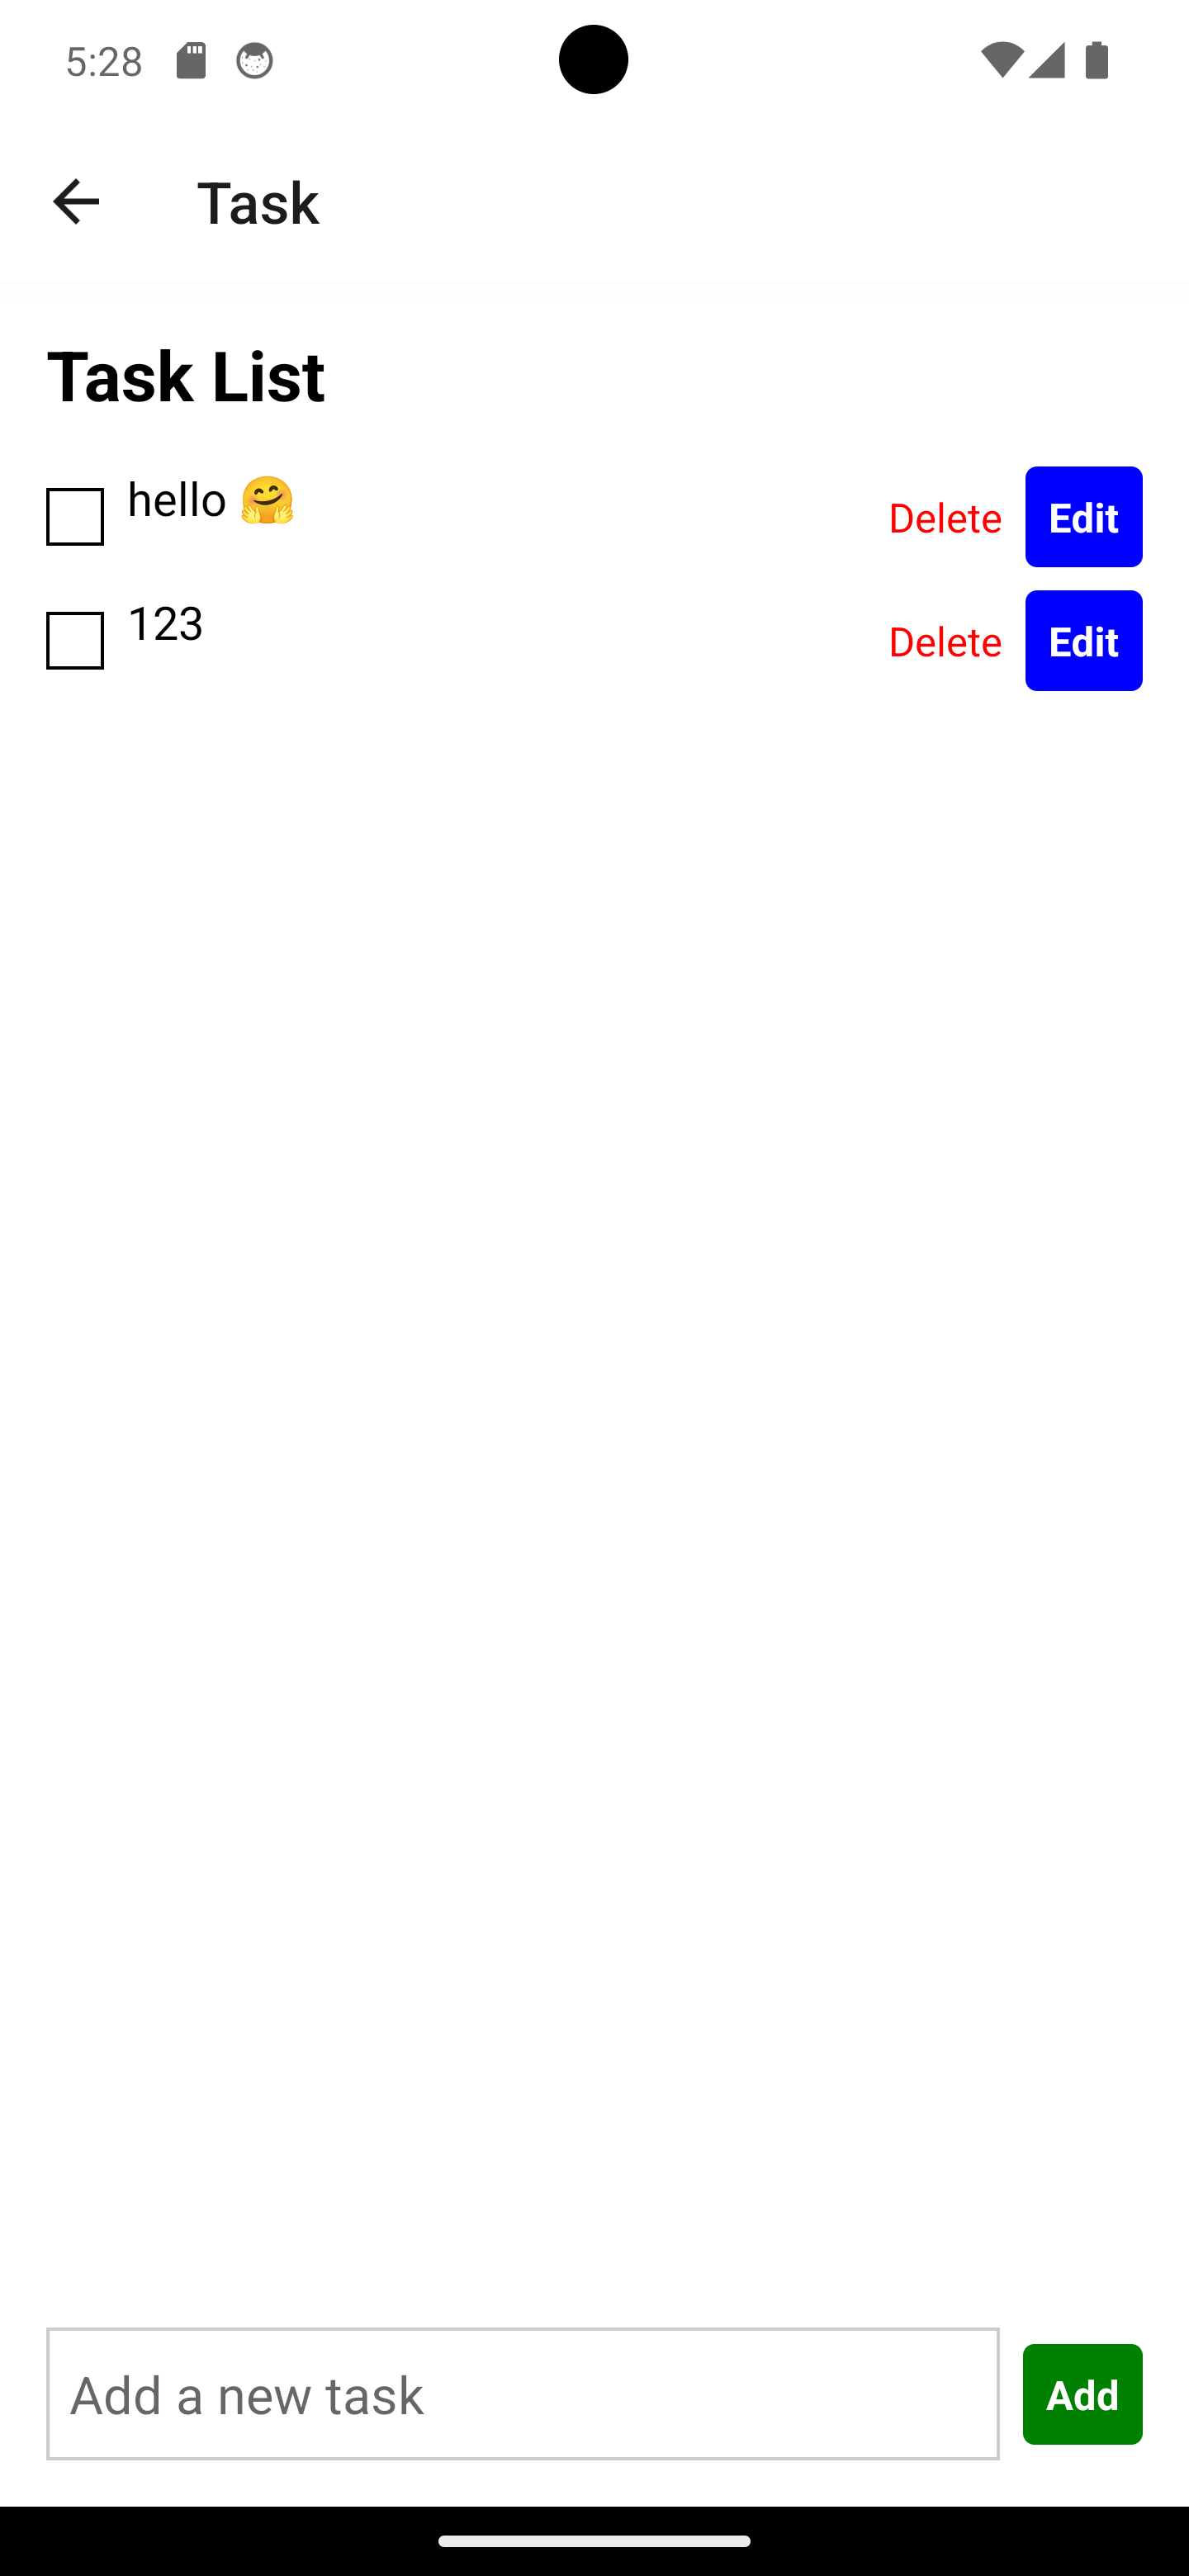
สามารถเพิ่ม Task ได้ด้วยการกดปุ่ม Add ตามปกติเลยโดยเบื้องต้นลองทดสอบเพิ่ม 2 Task เข้ามาให้ดู
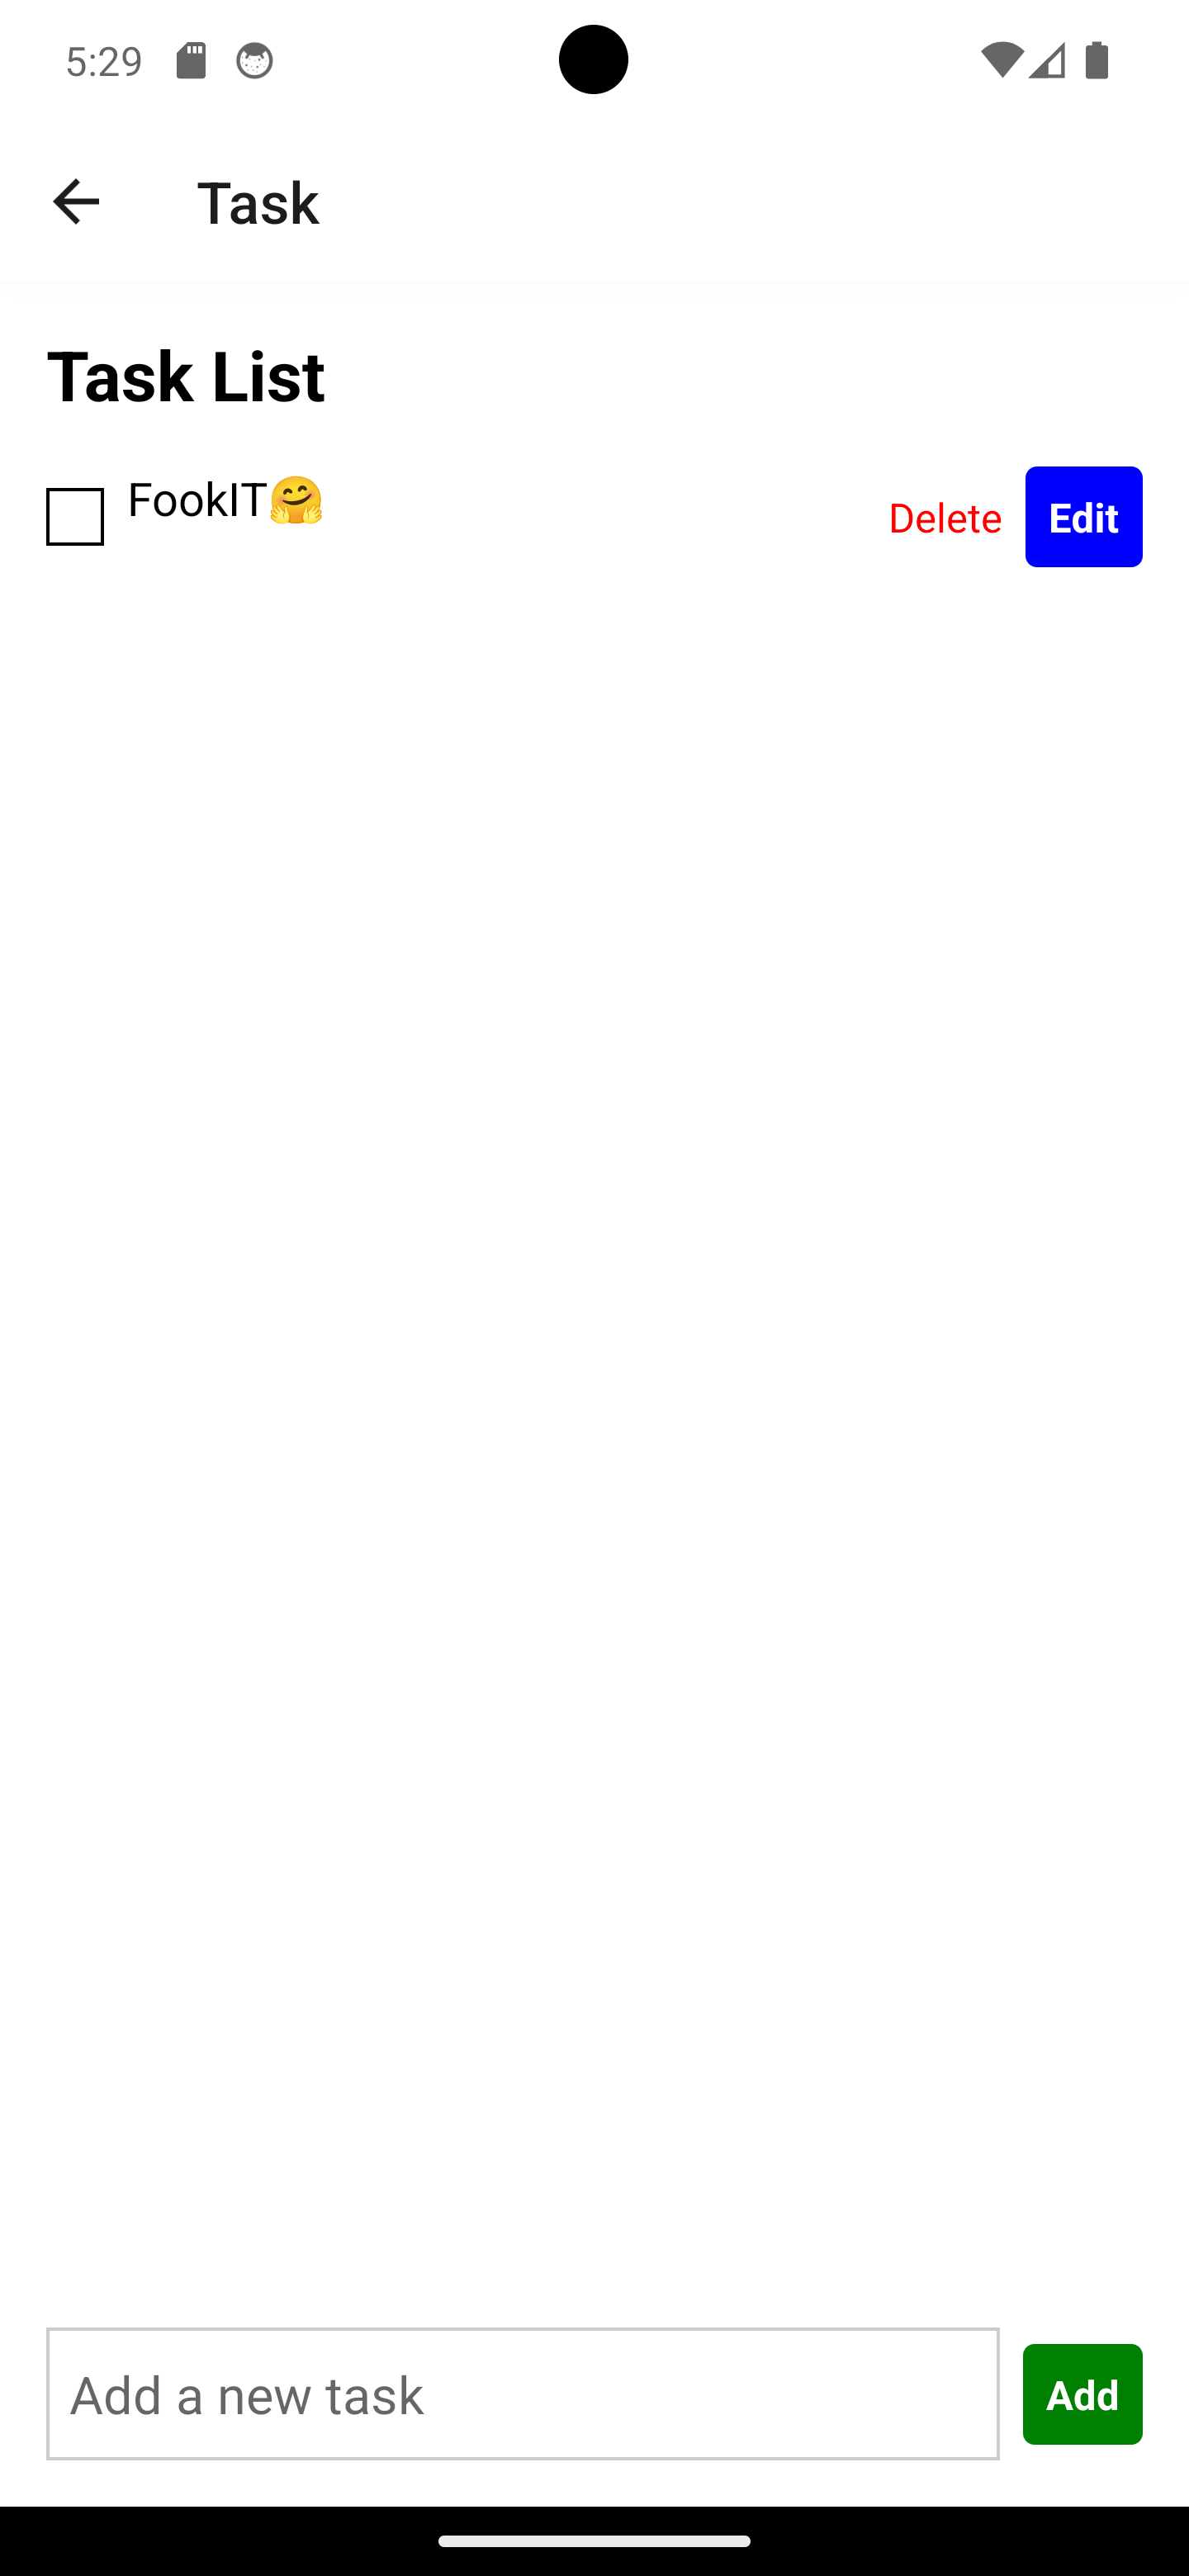
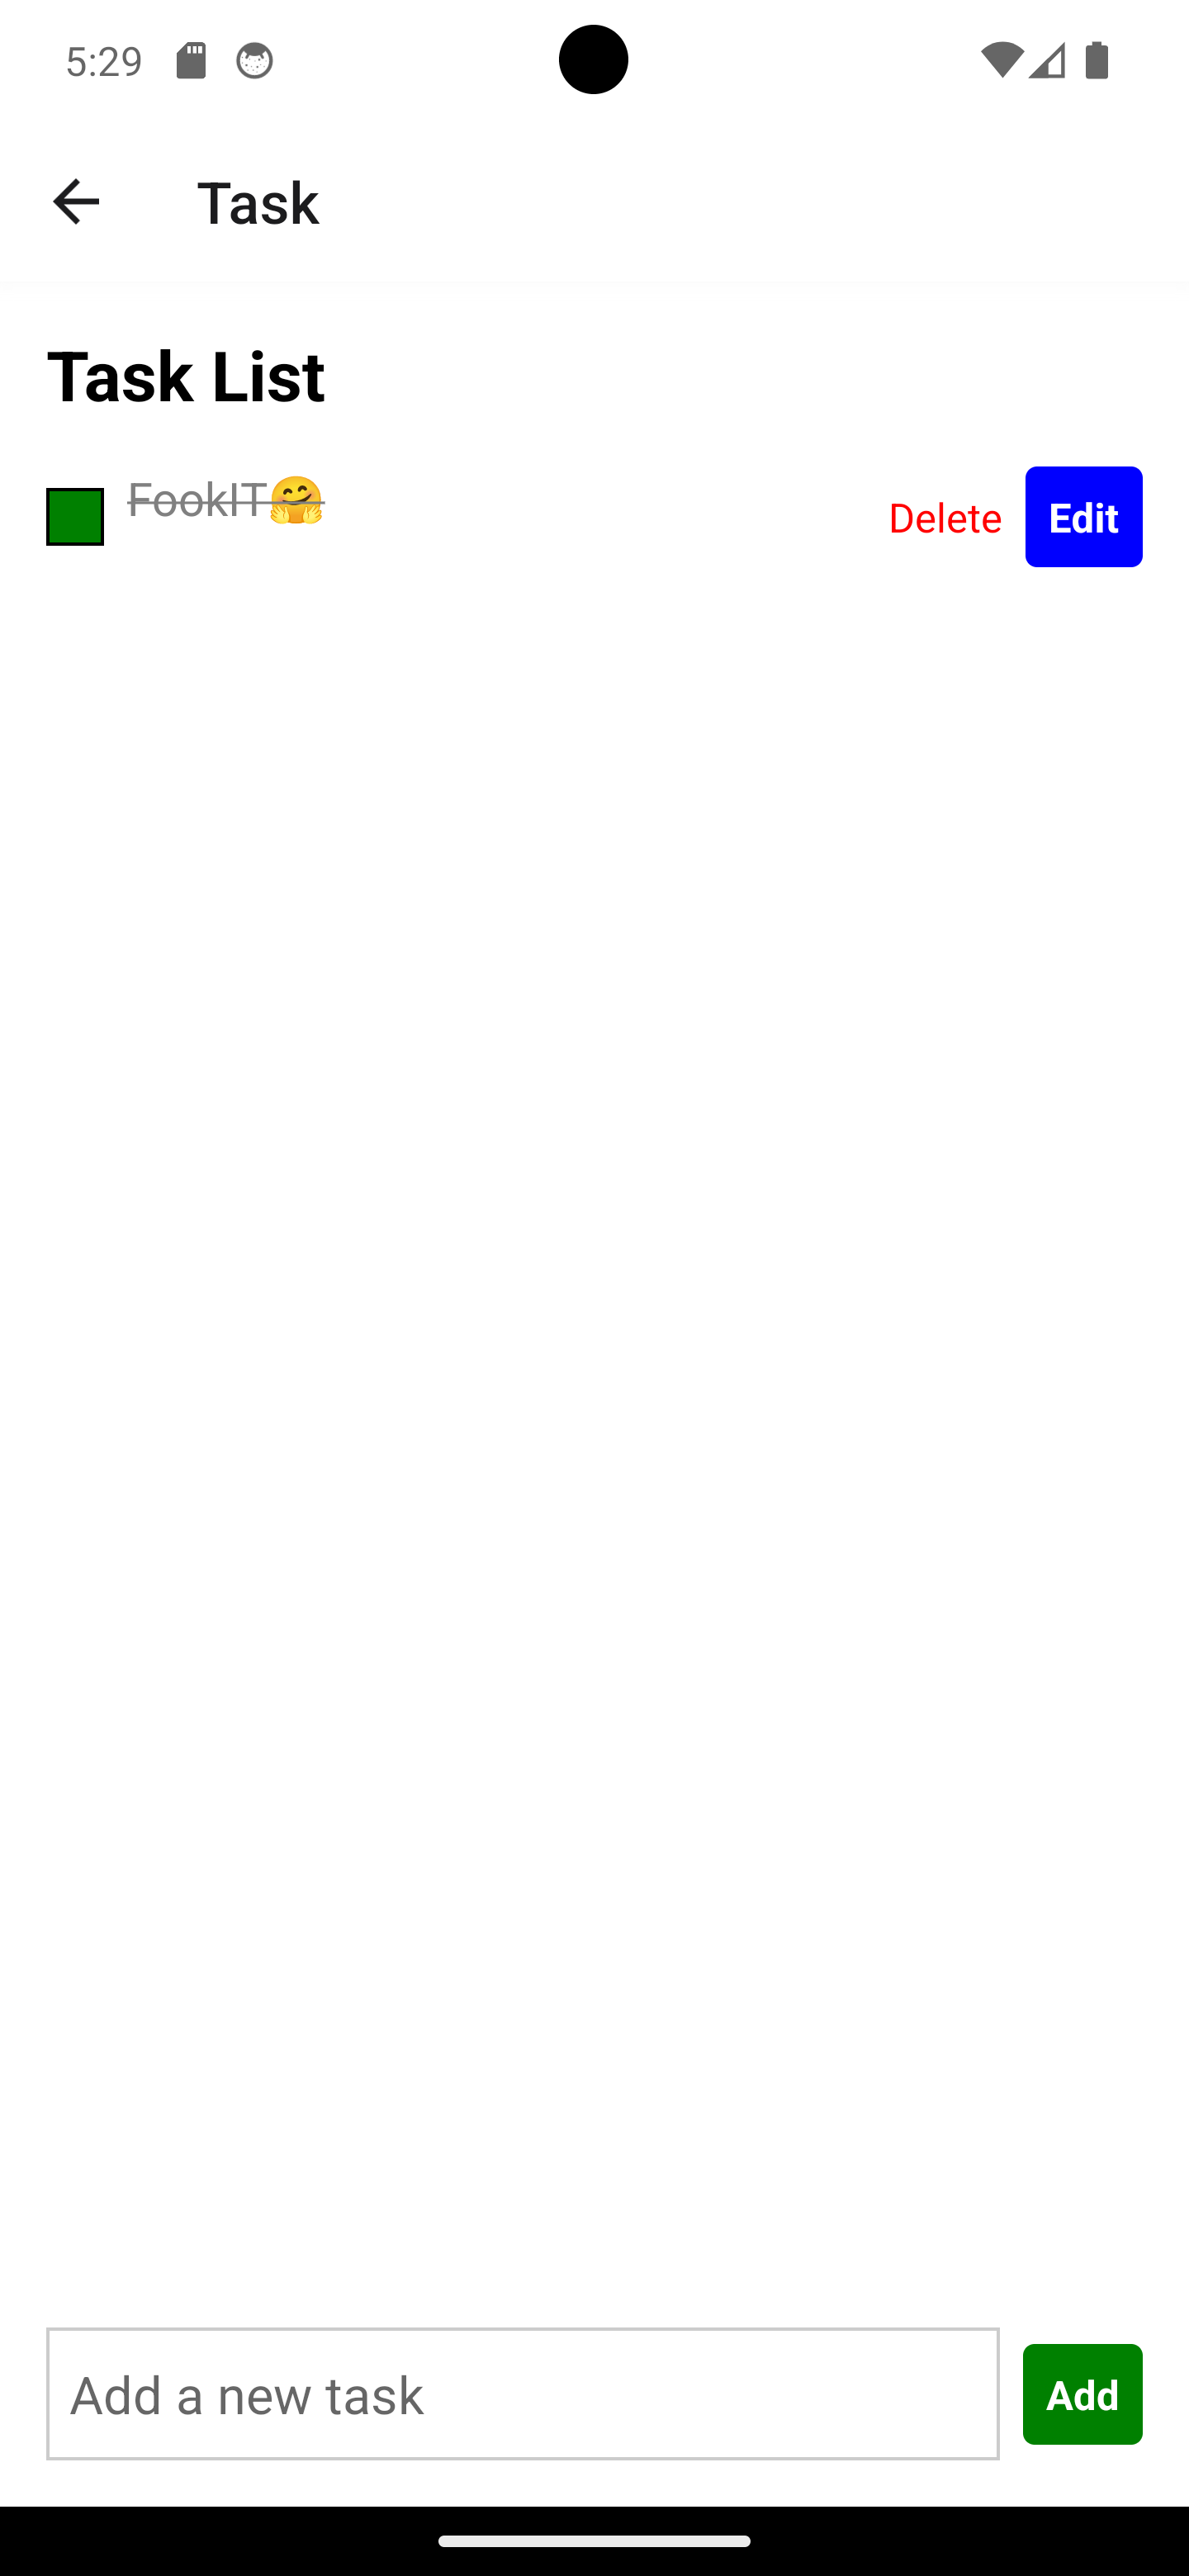
สามารถแก้ไขผ่านปุ่ม Edit ได้เลย เมื่อ Save แล้วก็จะแสดงข้อมูลที่ได้แก้ไป และสามารถติ๊กช่องว่างจะเป็นการแสดงขีดทับว่า Task นี้เราได้ทำเสร็จไปแล้วโดยการทำงานแบบคร่าว ๆ ก็จะประมาณนี้เลย
เพียงเท่านี้เราก็จะได้ AddTask ที่มีการทำงานที่จำเป็นครบถ้วนมาไว้ภายในแอปของเรากันแล้ววว ดูเรียบง่ายชัดเจนดีเลยเนอะ
สุดท้ายนี้ถ้าเพื่อน ๆ ชื่นชอบบทความนี้และคิดว่าเป็นประโยชน์ก็อย่าลืมกด ❤ ให้กันเพื่อที่จะได้ไม่พลาดความรู้ใหม่ ๆ ที่ส่งตรงถึงที่ให้กันไปแบบฟรี ๆ ไปเลย และในตอนนี้ผมก็ต้องขอตัวลาไปก่อน…
ขอบคุณที่เข้ามาอ่านกันนะครับ🙏
.
🦖 borntoDev – สร้างการเรียนรู้ที่ดี สำหรับสายไอทีในทุกวัน

แนะนำสำหรับคุณ
สงวนลิขสิทธิ์ © 2565 - ข้อมูลและเนื้อหาทั้งหมด - บริษัท บอร์นทูเดฟ จำกัด